Pressure calibration is critical for maintaining the accuracy and reliability of process equipment used in a variety of industries. Hysteresis is an important but frequently overlooked aspect of the calibration process. Understanding hysteresis and its ramifications will help you increase the accuracy and consistency of your pressure measurements. In this blog post, I’ll explain what hysteresis is, why it matters in pressure calibration, and how to manage it efficiently.
While hysteresis can occur in a variety of measurements, including temperature and electrical signals, this blog concentrates on its impact on pressure calibration, where it is most prevalent.
Table of contents
- What is hysteresis?
- Hysteresis in pressure calibration
- Causes of hysteresis in pressure instruments
- Identifying hysteresis
- Mitigating hysteresis
- Hysteresis in pressure switches
- Conclusion
- Beamex solutions
What is hysteresis?
Hysteresis is a phenomenon where the output of a system depends not only on its current input but also on its history of past inputs. In simpler terms, it means that a pressure sensor might not return to its original state after being subjected to varying pressures. This lag or difference can affect the accuracy of the measurements.
For example, if you increase the pressure to a certain value and then decrease it back to the same value, the instrument might show a different reading compared to the initial one. This difference is hysteresis.
For a practical example, if you calibrate a 100 kPa pressure instrument at a 50 kPa point, it may show 49.95 kPa with increasing pressure. With decreasing pressure, at the same 50 kPa point, it may show 50.05 kPa. This difference between 49.95 kPa and 50.05 kPa is caused by hysteresis.
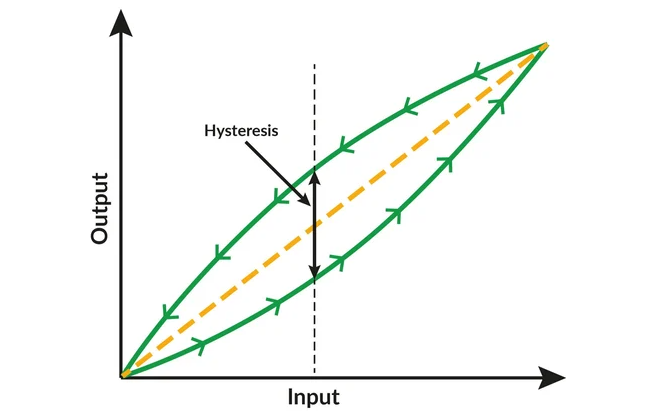
The image below shows a simplified illustration of hysteresis. Increasing and decreasing pressure do not follow the same line – there is a clear difference, which is hysteresis.
Hysteresis in pressure calibration
In the world of process instruments, hysteresis can have a significant impact on calibration. Pressure instruments – such as transmitters, sensors, and gauges – are expected to provide precise and repeatable readings. However, due to hysteresis, the readings can vary based on the instrument’s past pressure exposures. This can lead to errors and inconsistencies in your pressure measurements, which can be critical in processes where precision is key.
Causes of hysteresis in pressure instruments
Several factors can contribute to hysteresis in pressure instruments, such as:
- Material properties: The materials used in the construction of pressure-sensing elements can cause hysteresis due to their inherent properties.
- Design factors: The design and construction of pressure-sensing elements, including their mechanical components, can influence the level of hysteresis. Often in pressure sensors, the pressure stretches mechanical parts that can have a mechanical hysteresis, causing pressure measurement hysteresis.
- Contamination: Dirt or other contaminants inside the instrument can cause hysteresis by obstructing the movement of mechanical parts, leading to inaccurate readings.
- Environmental influences: Temperature changes, humidity, and other environmental conditions can affect the hysteresis behavior of pressure instruments.
Identifying hysteresis
To manage hysteresis effectively, it’s essential first to identify and measure it accurately. Here are some techniques:
- Up and down calibration: Conduct calibration by increasing and decreasing the pressure to identify any differences in the readings at the same pressure points. Please note that if you don’t wait long enough for the readings to stabilize, any delay or lag in the measurement instrument can look like hysteresis.
If you generate pressure with a hand pump, you need to be careful not to overshoot (or undershoot) when generating calibration points, or you may lose some of the hysteresis effect. For example, you need to approach the increasing points from below, and not overshoot and come back down. - Calibration cycles: Perform multiple calibration cycles to observe any discrepancies or repeatability issues in the readings. If there are any repeatability issues with the instrument, it may look like hysteresis. Therefore, it is good practice to perform several calibration repeats to reveal repeatability issues. Fully automated pressure calibration obviously makes it easier and saves time when performing multiple repeats.
- Graphical analysis: Plotting the pressure input vs. output readings can help visualize hysteresis. It may be very difficult to see the hysteresis in numerical results. If you have a pressure calibrator that displays the calibration results in graphical format (such as a Beamex MC6 family calibrator), it is much easier to identify hysteresis.
Sending calibration results to calibration software also helps, as the software often offers graphical presentation results (at least Beamex Calibration Management Software does).
Mitigating hysteresis
While hysteresis cannot be completely eliminated, it can be managed and minimized. Here are some best practices to help you do this:
- Regular calibration: Calibrate regularly, with up and down cycles, to identify hysteresis.
- Instrument selection: Choose high-quality pressure instruments with low hysteresis characteristics for critical applications.
- Consistent procedures: Follow consistent calibration procedures to ensure the repeatability and reliability of results.
- Instrument cleanliness: Ensure that instruments are clean and free from contaminants that could affect their performance.
- Environmental control: Whenever possible, maintain stable environmental conditions during calibration to reduce external influences. Of course, this is not always possible when calibrating instruments in field conditions.
Hysteresis in pressure switches
With any switches, including pressure switches, there is a hysteresis-like feature called “deadband”. This means that the switch has been designed so that there is some difference between the opening and closing points with increasing and decreasing pressure. This may seem a lot like hysteresis, or even be called hysteresis, but it is not actual hysteresis.
This deadband is needed and important in switches, otherwise the switch could start oscillating between open and closed when the pressure is at a certain value. Because switches are used to control specific operations, this is undesirable. Anyhow, you can learn more on pressure switches in this blog post: Pressure Switch Calibration.
Conclusion
Hysteresis is a critical factor to consider in pressure calibration, especially in the world of process instruments, where precision is paramount. By understanding what hysteresis is, identifying its causes, and implementing best practices to manage it, you can ensure more accurate and reliable pressure measurements.
Source: Beamex


